Table of Contents
- How to Take Down Roof Christmas Lights Safely
- How to Inspect Christmas Lights Before Storage
- How to Store Christmas Lights Without Tangling
- Organizing and Labeling Your Light Strings
- How to Store Christmas Light Clips and Accessories
- Choosing the Right Storage Container and Location
- Maintaining Your Roof Lights for Next Season
- Frequently Asked Questions
Last Updated: October 5, 2026
How to Take Down Roof Christmas Lights Safely
Taking down roof lights safely requires careful planning, proper equipment, and methodical work to avoid damage to your lights, home, or yourself.
Use Proper Equipment and Techniques
Start with a sturdy ladder, work gloves, and a helper on the ground. Never remove roof lights alone, a spotter prevents serious injury if you lose your balance.
Work from the bottom up to prevent lights from falling on you. Gently loosen clips and fasteners rather than yanking, roof clips, gutter clips, and shingle clips can damage your home if removed carelessly.
Unwind light strings slowly to avoid tangles and broken bulbs. Have your helper coil each section loosely and place it safely on the ground.
Work in Daylight and Check Weather
Remove roof lights during daylight hours when the weather is calm. Clear visibility prevents missteps and accidents.
Avoid wet or icy conditions, wet roofs are slippery and cold weather makes plastic clips brittle. Choose a clear, dry day.
How to Inspect Christmas Lights Before Storage
Inspect lights thoroughly before packing to catch problems while you can still repair or replace them.
Test Each String for Functionality
Plug in each light string and verify all bulbs light up. If some bulbs are dark, replace individual bulbs rather than discarding the entire string, replacement bulbs are inexpensive and widely available.
Look for flickering or dimming, which suggest loose connections, failing bulbs, or corroded sockets.
Test mini lights and larger bulbs separately, as they have different power requirements. For LED strings, check color consistency, dimmer or different-shade LEDs indicate internal wiring issues.
Look for Physical Damage
Inspect cords for cracks, cuts, or exposed wiring, especially at bends and coiled areas. Damaged cords are a fire hazard (CPSC Cautions On Christmas Tree Lights).
Replace missing or broken bulbs now, next season you won’t remember which strings are incomplete. Keep spare bulbs of each type in your storage bin.
Check connectors and sockets for white or green corrosion, common on roof-mounted lights. Light corrosion can be cleaned with a dry cloth or pencil eraser; heavier corrosion requires a wire brush.
Assess Bulb and Cord Condition by Age
Incandescent mini lights typically last 3-5 seasons before bulbs fail frequently; LED strings last 10+ years. If lights are older than five years and showed multiple failures, replacement may be more cost-effective than repeated repairs.
Check plastic housing for brittleness or stress cracks, UV exposure and temperature extremes degrade plastic over time. Fragile plastic indicates the string is nearing the end of its useful life.
Create a Condition Label
Label each string with its condition: Working (ready to use), Needs repair (fixable issues), Questionable (test again before using), or Do not use (safety hazards). Use waterproof labels or permanent marker on the cardboard wrap or storage reel to prevent accidental installation of faulty strings.
How to Store Christmas Lights Without Tangling
Prevent tangled lights by storing them correctly from the start.
Cardboard Wrapping Method
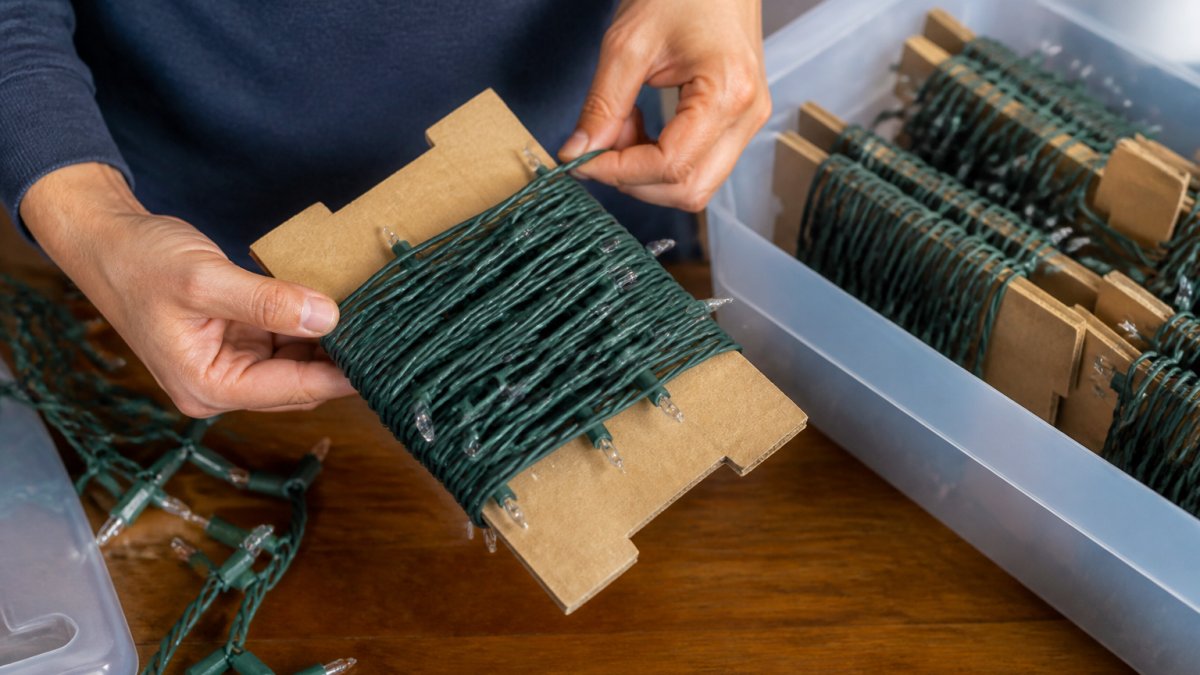
Cut cardboard into a 12-inch-wide rectangle and wrap light strings around it in neat, tight coils. Secure the end with a zip tie and label with string length and light type. This simple method works well for mini lights and standard strings.
Storage Reel or Spool Approach
Storage reels wind lights in even layers and work well for large quantities. They take up less space than cardboard and are reusable. Label each reel with light type and length, and store upright.
Plastic Hanger and Zip Tie Technique
Use a plastic closet hanger as a winding tool, wrapping lights around the arms in neat coils and securing with zip ties. This quick method works best for smaller strings and mini lights.
Organizing and Labeling Your Light Strings
Organization saves time and frustration when you decorate next season. A simple system prevents confusion and helps you find exactly what you need.
Sort by Light Type and Size
Separate mini lights from larger bulbs. Keep roof lights separate from pathway lights. Group lights by color, warm white, cool white, multicolor.
Create a section for specialty lights like icicle lights or net lights. Keeping similar types together makes it easy to find what you need when decorating.
Create a Labeling System
Label each string with light type, color, approximate length, and year purchased. Include condition notes like “missing bulbs” or “flickers.” Keep a master inventory list noting how many strings you have of each type to plan next season’s display.
How to Store Christmas Light Clips and Accessories
Roof clips, gutter clips, shingle clips, and extension cords are as important as the lights. Proper storage prevents lost pieces, damaged roofing, and makes next installation faster.
Remove, Clean, and Inspect Roof Clips
Remove roof clips, gutter clips, and shingle clips as you take down lights and place them immediately in a labeled container. Do not leave clips on the roof or gutters, they degrade and can damage your roof.
Inspect clips for cracks, broken tabs, or damage. Clean minor dirt with a soft brush; soak stubborn residue in warm water and scrub gently. Test each clip by opening and closing it several times, stiff or non-closing clips should be replaced.
Organize Clips by Type and Location
Keep roof clips, gutter clips, and shingle clips in separate labeled bags or small bins.
If you have a large display, consider organizing clips by roof section or area. For example, label bags as “Front gable,” “East eave,” “Gutter line,” etc.
Count your clips by type and note the count on the label. If you’re short on clips next season, you’ll know in advance and can order replacements rather than discovering the shortage mid-installation.
Create a Reinstallation Map
Take a photo of your roof display before taking it down, or sketch a simple diagram showing where lights were mounted. Note which sections used roof clips versus gutter clips, and how many clips were used per section. Store this photo or diagram with your clips and lights.
When you’re ready to decorate next season, this map eliminates guesswork. You’ll know exactly how many clips you need, where they go, and whether you need to purchase additional hardware.
Bundle and Protect Extension Cords
Coil extension cords neatly using the same wrapping method as light strings, wrap them around cardboard or a storage reel and secure with zip ties.
Inspect cords for damage before storing. Check for cuts, cracks, exposed wiring, or damaged plugs. Damaged cords should be discarded, they are a fire and shock hazard.
Label each coiled cord with its length and rating (indoor or outdoor). Store cords in a dedicated bag or container and label it clearly. Keep cords away from lights to prevent tangling during storage.
Store Surge Protectors and Timers
If you used outdoor surge protectors or timers to control your lights, clean them and inspect for damage. Wipe down the exterior with a dry cloth. Check that all outlets work and that any buttons or switches operate smoothly.
Store surge protectors and timers in a small labeled box or bag, separate from lights and cords. Include any instruction manuals or warranty information. If you used a specific timer setting or schedule last season, note it on the box so you can replicate it next year without having to reprogram from scratch.
Choosing the Right Storage Container and Location
Where and how you store your lights matters. The right environment protects them from damage and keeps them ready for next season.
Select a Storage Box or Bin
Use a plastic storage bin with a tight-fitting lid. Plastic protects lights better than cardboard boxes, which can absorb moisture. Choose a bin large enough to hold your lights without crushing them.
Clear plastic bins let you see contents without opening them. Label the outside clearly with “Holiday Lights” and a year or description.
Avoid overstuffing bins. Crushed lights can break bulbs and damage cords. Use multiple bins if needed.
Keep Lights in a Cool, Dry Place
Store lights in a temperature-controlled space. Basements and attics work well if they stay relatively dry. Avoid garages in humid climates, moisture damages cords and corrodes connections.
Keep lights away from direct sunlight. UV exposure can degrade plastic and fade colors over time.
Ensure good air circulation in your storage space. Stagnant, humid air promotes mold and corrosion.
Protect from Moisture, Heat, and Pests
Use silica gel packets or desiccant packs in your storage bins to absorb moisture. Replace them annually. This simple step prevents corrosion and extends light life.
Keep lights away from heating sources and extreme heat. Heat degrades plastic and can damage LED components.
Store lights off the floor to protect them from water damage during flooding. Use shelving or pallets to elevate bins.
Check your storage area periodically for signs of pests. Rodents can chew through cords and damage lights. If you notice pest activity, relocate your lights or use pest deterrents.
Maintaining Your Roof Lights for Next Season
Proper storage is just the beginning. A few additional steps ensure your lights are in perfect condition when you’re ready to decorate again.
Store in Original Packaging When Possible
If you still have original packaging for your lights, use it. Manufacturers design original packaging to protect lights during storage and transport.
Original packaging also makes it easier to identify light specifications and warranty information. Keep receipts and warranty cards with your lights.
If original packaging is unavailable, wrap lights carefully in tissue paper before placing them in storage bins. This adds a protective layer.
Create an Inventory System
Beyond simple labeling, maintain a detailed inventory. Note:
- Number of light strings by type
- Total footage of lights
- Condition of each string
- Date purchased
- Any repairs needed
Keep this inventory in a spreadsheet or notebook. Review it before next season to plan your display and identify lights that need replacement.
Track which lights work best in which locations. If certain strings performed poorly last year, plan to replace them.
Use your inventory to budget for new lights or replacements. Knowing exactly what you have prevents overbuying and ensures you have the right types for your display.
Storing roof lights properly protects your investment and makes next season’s decorating easier. If managing your holiday lighting feels overwhelming, consider professional help. Holiday Decorating services can handle the heavy lifting, from safe roof removal to proper storage, so you can enjoy the holidays without the hassle.
Frequently Asked Questions
What is the safest way to take lights down from a roof?
Always work during daylight hours and avoid wet or icy conditions. Use a stable ladder with proper footing, and consider a second person to steady the ladder. Gently remove clips from the roof edge or gutters rather than pulling hard on the light strings. If you’re uncomfortable working at height, professional installation services like Houston Light can handle removal safely with insured labor and proper equipment.
Should you test roof lights before storing them?
Yes, testing lights before storage helps you identify broken bulbs or damaged sections early. Plug each string into an outlet and check for flickering, dark spots, or non-functioning bulbs. Replace any faulty bulbs or sections now so your lights are ready to use next season without surprises. This inspection step prevents wasting storage space on lights that won’t work when you need them.
How do you keep Christmas lights from tangling in storage?
The most effective methods are wrapping lights around cardboard cutouts, using a storage reel, or securing them with zip ties to a plastic hanger. Avoid coiling lights tightly or tossing them loose into a box. Each method keeps light strings organized and prevents the knotted mess that makes setup difficult next year. Label each wrapped bundle so you know exactly what you have.
How should you store roof light clips and extension cords?
Remove roof clips, gutter clips, and shingle clips from the roof and store them in a separate labeled container. Coil extension cords loosely and secure them with velcro straps or zip ties to prevent tangling. Keep clips and cords in a dry location away from moisture and extreme temperatures. Storing accessories separately from light strings makes reinstallation faster and prevents damage to both.