Table of Contents
- What Do Professionals Use to Hang Christmas Lights?
- The Best Clips for Hanging Christmas Lights
- How to Safely Hang Roof Lights
- How to Keep Christmas Light Lines Straight
- Electrical Load and Wattage Capacity: The Step Most DIYers Skip
- Long-Term Maintenance and Winterization
- Frequently Asked Questions
Last Updated: September 11, 2026
What Do Professionals Use to Hang Christmas Lights?
Professionals hang Christmas lights with commercial-grade clips, bulk socket wire, and mounting hardware designed to survive wind, rain, and freeze-thaw cycles, not the thin plastic hooks sold at big-box stores. At Houston Light, our crews have installed displays across the Greater Houston area for 15 years, and the tools we reach for barely resemble a homeowner’s starter kit. Below, we’ll show you exactly what the pros use, how they attach it without wrecking your roof, and the electrical math most DIY guides skip entirely.
The difference matters because holiday lighting is a seasonal investment. A clip that fails in a December windstorm takes the whole run down with it. A circuit that overloads trips a breaker at the worst possible moment. And a sloppy installation can pull gutters loose or stain siding within a single season.
Here’s what most guides get wrong: they treat hanging Christmas lights as a decorating task when it’s really a light construction and electrical task. Once you understand that framing, every tool choice makes more sense.
The three things that separate a professional installation from a DIY one: rated clips instead of generic hooks, calculated electrical load instead of guesswork, and mounting methods that leave zero damage behind.
The Best Clips for Hanging Christmas Lights
The best clips for hanging Christmas lights are ones matched to the specific surface they attach to, because a gutter clip, a shingle tab, and an adhesive hook each solve a different problem. Using the wrong clip for the surface is the single most common installation mistake we see.
Gutter Clips and Shingle Tabs
Gutter clips snap onto the lip of a gutter or the edge of a fascia board, holding the light string in a fixed, uniform position. Shingle tabs slide under the edge of a shingle course, which keeps the wire off the roof surface and out of standing water. Both are designed to be non-damaging: they grip without screws, nails, or adhesive that leaves residue.
Professionals favor clips rated for outdoor use and cold temperatures. Cheap clips become brittle in a freeze and snap, dropping an entire run. The good ones stay flexible season after season.
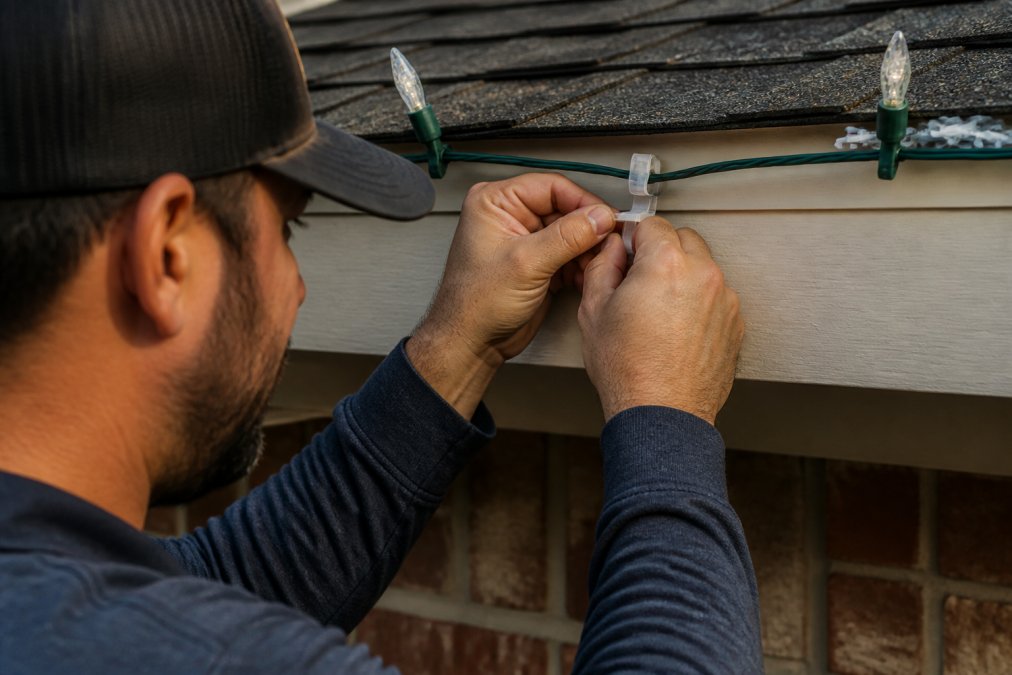
Adhesive Hooks and Non-Damaging Mounting
Adhesive hooks work on smooth surfaces like vinyl soffit, metal trim, or window frames where clips won’t grip. The catch is surface preparation. Adhesive fails on dust, moisture, or cold substrate, so professionals clean and dry the surface first and apply hooks above a minimum temperature threshold.
For stucco, brick, and painted wood, crews use clips that grip the material itself rather than relying on adhesive. This is where experience shows: the right mounting method for your wall is not always the obvious one.
| Surface | Best Mounting Method | Why |
|---|---|---|
| Gutter / fascia | Gutter clips | Snaps on, no fasteners, repositionable |
| Asphalt shingles | Shingle tabs | Slides under shingle, keeps wire off roof |
| Vinyl soffit | Adhesive hooks | Clips won’t grip smooth vinyl |
| Brick / stucco | Surface-grip clips | Adhesive fails on porous texture |
| Metal trim | Adhesive hooks | Clean, flat, holds well when dry |
How to Safely Hang Roof Lights
Safety is the part of hanging roof lights that separates a professional crew from a weekend project, and the difference is gear, not bravery. Ladder stabilizers, roof anchors, and fall protection turn a risky climb into a controlled one.
Ladder Stabilizers and Advanced Roof Safety Gear
A ladder stabilizer spreads the ladder’s contact points against the wall and keeps it from shifting sideways, which is the most common cause of ladder falls. Beyond that, professionals working at height use roof anchors, harnesses, and non-slip footwear, and they never work alone.
A few rules our crews follow without exception:
- Set the ladder on firm, level ground and secure the base
- Maintain three points of contact at all times
- Keep both hands free by using a tool belt or bucket
- Never reach sideways; move the ladder instead
- Check the weather, because wind and wet surfaces change everything
The OSHA guidance on ladder safety is worth reading before your first climb, even if you’ve hung lights for years.
The most dangerous shortcut is overreaching from a ladder instead of repositioning it. It takes ten extra seconds to move the ladder and can prevent a fall that ends your season, or worse.
How to Keep Christmas Light Lines Straight
Straight lines come down to three things: consistent light spacing, correct tension, and proper bulb orientation. Get those right and your display looks intentional; get them wrong and it looks like a tangled extension cord.
Visual Aesthetic Principles for a Professional Look
Professionals start with a plan before a single clip goes up. They decide the spacing between bulbs, the direction the bulbs face, and how the run will turn corners. Uniformity is what reads as “professional” from the street.
Here’s the framework we use:
- Spacing: Keep bulb spacing even across the entire run. Uneven spacing is the first thing the eye notices.
- Tension: Pull the line snug but not tight. Too loose and it sags; too tight and it stresses the clips.
- Bulb orientation: Face every bulb the same direction so the glow reads evenly.
- Custom cut: Cut and terminate stringer sets to the exact length of each run rather than doubling wire back on itself.
Custom-cut runs eliminate the messy bundles of extra wire that ruin an otherwise clean line. This is one of the clearest differences between a store-bought kit and a professional install.
Electrical Load and Wattage Capacity: The Step Most DIYers Skip
Electrical load calculation is the step that keeps your display running and your breaker from tripping, and it’s the one most homeowners never do. Every circuit has a wattage capacity, and every string of lights draws against it. Get the math wrong and you either trip a breaker mid-December or, worse, overheat a cord that was never rated for the load.
How to Calculate Load on a Circuit
The math is straightforward once you know the numbers to look for. Every light string lists its wattage or amperage on the tag near the plug. Add the wattage of every string and every accessory on a single circuit, then compare that total to the circuit’s capacity.
A standard household branch circuit in the U.S. is rated at 15 or 20 amps at 120 volts (osha.gov). That works out to roughly 1,800 watts on a 15-amp circuit and 2,400 watts on a 20-amp circuit. The National Electrical Code treats a circuit as continuously loaded when a load runs for three hours or more, and the common practice is to keep a continuous load at no more than 80 percent of the breaker rating, about 1,440 watts on a 15-amp circuit and 1,920 watts on a 20-amp circuit (nfpa.org). Holiday displays run for hours at a time, so the 80 percent figure is the one to plan around.
Here’s how that plays out in practice:
- Incandescent C9 strings draw roughly 5 to 7 watts per bulb, so a 25-bulb string can pull 125 to 175 watts. Two or three of those strings can eat most of a 15-amp circuit.
- LED C9 strings draw a fraction of that, often under 1 watt per bulb, so the same 25-bulb run might pull only 5 to 10 watts. That’s why switching to LED is the single biggest lever on how much you can put on one circuit.
- Mini lights vary widely by count and bulb type, so always read the tag rather than assuming.
Why This Matters More Than Most Guides Admit
Overloading a circuit doesn’t always announce itself with a tripped breaker. Undersized extension cords and daisy-chained strings can heat up at the connections before the breaker ever notices, which is where the real fire risk lives. The U.S. Consumer Product Safety Commission and the National Fire Protection Association both publish guidance on outdoor electrical safety, and both point to overloaded circuits and damaged cords as recurring causes of holiday decoration fires.
A few professional habits that prevent problems:
- Do the math before you plug in. Write down the wattage of every string on a circuit and total it. If you’re over 80 percent of the breaker rating, split the display.
- Use outdoor-rated extension cords sized for the load. A cord’s wire gauge (AWG) determines how much current it can carry safely over its length. A longer run needs a heavier gauge, not a lighter one.
- Split large displays across multiple circuits. It’s normal for a professional install to use two or three dedicated circuits for a single roofline.
- Keep connections weatherproof and off the ground. Water in a connection is a short waiting to happen.
- Switch to LED. Lower draw per bulb means more lights per circuit and less heat at every connection.
Label each circuit and note what’s plugged into it. When a breaker trips mid-season, you’ll know exactly which run to check instead of guessing in the cold.
This is the part of the job where a professional installation earns its keep. A crew that calculates load before the first clip goes up avoids the mid-season troubleshooting that turns a display into a chore.
Long-Term Maintenance and Winterization
Maintenance is where a professional installation pays for itself, and it’s also the part of the job most homeowners underestimate. A display that takes a weekend to install can take weeks to repair if it’s built on worn hardware. The difference between a pro install and a DIY one isn’t just how it goes up, it’s how it holds up from Thanksgiving through New Year’s.
In-Season Maintenance: Keeping the Display Looking Professional
Lights fail during the season, not just before it. A bulb burns out, a socket corrodes, a clip pulls loose in a windstorm. Professionals plan for this rather than reacting to it.
A few habits that keep a display sharp all December:
- Carry spare bulbs and fuses matched to each string type. A burned-out bulb in a series string can take down the whole run, and the fix takes seconds if you have the right replacement on hand.
- Walk the display after every major storm. Wind and ice are the two biggest causes of sagging lines and dislodged clips. A five-minute visual check catches problems before they cascade.
- Repair wire, don’t replace runs. A nicked or frayed section of wire can often be cut out and re-terminated rather than swapping the entire string, which saves both time and material.
- Watch for color shift. LEDs dim gradually and can shift color temperature over years of use. Mixing a new string into an older run can create a visible mismatch, so professionals keep spare strings from the same batch when possible.
- Keep connections dry. Re-check that every outdoor connection is elevated and weatherproofed. A connection sitting in a puddle is the most common cause of a mid-season outage.
Winterization and End-of-Season Storage
How lights come down matters as much as how they go up. Rushing the takedown is how clips get lost, wires get kinked, and next year’s install starts with a box of tangled, half-broken strings.
A professional takedown looks like this:
- Test every string as it comes down. It’s far easier to flag a dead run in January than to discover it next November.
- Inspect clips and cords for wear. Replace anything cracked, brittle, or frayed before it goes into storage. Cold makes cheap plastic brittle, and a clip that survived one season may not survive two.
- Coil each run and label it. Store by run, not by pile. Next year’s install goes faster when you know which string belongs on which roofline.
- Store in a dry, temperature-controlled space. Extreme heat and moisture degrade wire insulation and adhesive backing over the off-season.
The most expensive mistake is storing lights in a hot garage or attic. Heat and humidity break down insulation and adhesive, so the hardware you paid for quietly fails before it ever goes back up.
This is the part of the job most homeowners never see. A display that looks effortless from the street is the product of hardware chosen to last, load calculated before the first clip, and a maintenance routine that runs all season. Houston Light offers [commercial holiday lighting(/tag/how-to-safely-install-outdoor-holiday-lighting/) | houstonlight.com] and HOA holiday lighting programs built around durable materials and a lifetime warranty on installations, so the maintenance burden stays with us, not you.
Frequently Asked Questions
What do professional Christmas light installers use to attach lights to shingles?
Professionals typically use shingle tabs or all-in-one clips that slide under the shingle edge without nails or screws. These clips hold the socket wire firmly while keeping the bulb facing outward. Many installers pair them with gutter clips on the fascia board so the run stays level and uniform. The goal is a non-damaging mount that survives wind and rain without cracking shingles or leaving holes behind.
How do pros keep Christmas light lines perfectly straight?
Straight lines come from custom-cut light line rather than pre-cut store strands. Installers measure each run, cut the socket wire to length, and add male and female plugs so there is no slack or excess coiled at the corner. They also keep equal light spacing, set consistent tension, and align every bulb in the same orientation. That combination is what makes a roofline read as one clean, professional line instead of a wavy string.
Can I hang Christmas lights without damaging my roof or siding?
Yes, when you choose the right clips and skip staples, nails, and screws. Gutter clips, shingle tabs, and adhesive hooks are designed to be non-damaging and removable. Keep the mounting on the fascia board or under the shingle edge rather than through the roofing material. Before installation, check that each clip is outdoor rated and weatherproof, and remove everything carefully at the end of the season so the surface stays intact.
How much maintenance do professionally installed lights need?
A well-installed system needs very little. Expect a quick check after the first big storm to confirm clips are still seated and lines have not shifted. LED bulbs rarely fail, but a flickering section usually means a loose connection at a male and female plug, not a bad strand. At the end of the season, take the lights down, inspect the socket wire, and store them neatly so next year’s installation is faster and the lines stay straight.