Table of Contents
- How to Plan a Professional Holiday Light Display
- Design Principles That Make Luxury Christmas Lights Look Expensive
- Luxury Outdoor Christmas Decor Ideas That Go Beyond Strings of Lights
- Modern LED Holiday Lighting Trends Worth Using in 2026
- Power, Hardware, and Weatherproofing for a Flawless Installation
- When to Hire Professional Holiday Lighting Services
- Conclusion: Turning Your Design Plan Into a Display
- Frequently Asked Questions
Last Updated: September 10, 2026
How to Plan a Professional Holiday Light Display
A luxury Christmas light display starts with a plan: measured dimensions, defined zones, and one clear focal point. This guide walks through how to design luxury Christmas light displays the way professional installers do.
The difference between a display that looks expensive and one that looks like a hardware store exploded on your lawn comes down to restraint and structure. More lights do not create luxury. Better placement does.
Below, we’ll cover how to plan the layout, choose hardware, and decide what to hand off to a professional holiday lighting services team.
Measure Your Property and Set Your Goals
Start with a tape measure and a phone camera. Walk the property at dusk, photograph every elevation, and note the roofline, eaves, gables, and entry. Record linear footage for each run, then add 10 percent for slack and turns.
Your goals shape everything after this. A warm, static outline for a traditional home looks nothing like an animated commercial frontage, and the hardware budget follows the goal.
Map Zones and Choose a Focal Point
Divide the property into three to five zones: entry, primary façade, roofline, trees, and any secondary structure like a garage or fence. Give each zone a job.
Then pick one focal point. A single wreath above the door, a lit tree pair flanking the entry, or a wrapped column reads as intentional. Five competing focal points read as noise.
One focal point per sightline. If a guest can’t tell where to look first, the display has no hierarchy.
Design Principles That Make Luxury Christmas Lights Look Expensive
Symmetry, visual hierarchy, and consistent color temperature do more for a display than any single product. A modest home with a clean, symmetrical outline outclasses a large home with scattered, mismatched strands.
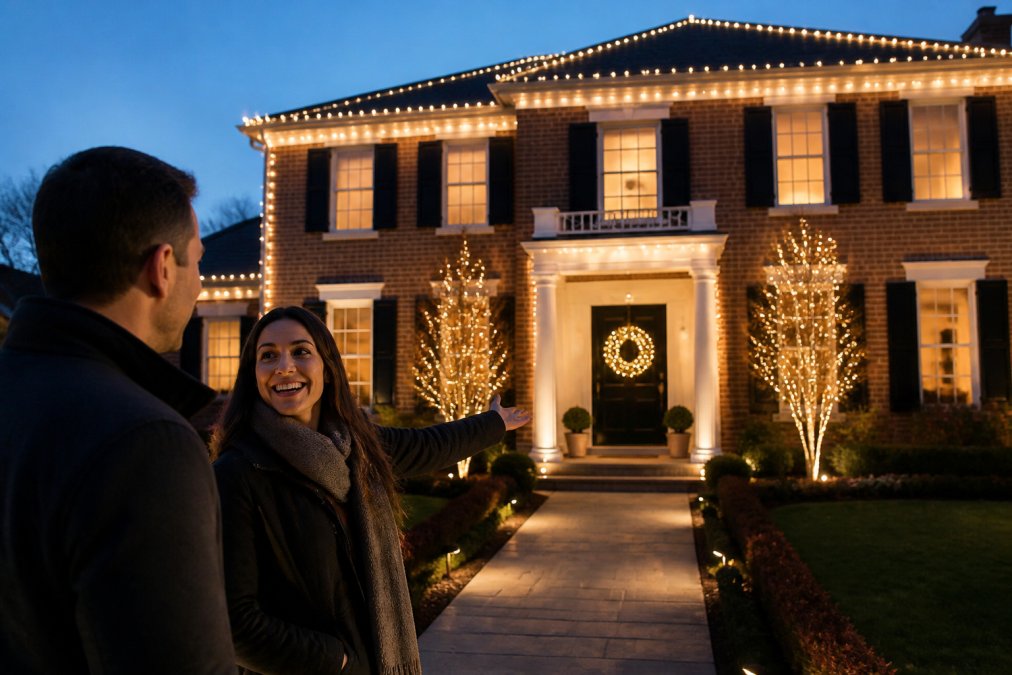
Symmetry, Visual Hierarchy, and Color Temperature
Color temperature is the warmth or coolness of white light, measured in Kelvin. Warm white sits around 2700K to 3000K and reads as traditional and elegant (energy.gov). Cool white runs 5000K and up and reads as crisp and modern.
Pick one and stay with it across every white light on the property. Mixing warm and cool white on the same façade is the most common mistake we see, and it makes even premium fixtures look cheap.
Symmetry matters just as much. If you light one column, light its twin. If you wrap one tree, wrap its pair. The eye forgives almost anything except imbalance.
Architectural Integration: Working With the Roofline and Facade
Most guides treat the house as a blank canvas. It isn’t. Good architectural integration means the lighting follows the building’s own lines rather than fighting them.
Trace the actual roofline and eaves rather than running a straight horizontal strand across a peaked gable. Highlight structural features the architect emphasized: columns, arches, dormers, and the transition between stories. On brick or stone, use mounting clips that keep strands off the surface so the material still reads in daylight.
Photograph your house at night with the porch light on before you plan anything. The building already tells you where its natural lines are, and the camera catches angles you’ll miss standing in the yard.
Luxury Outdoor Christmas Decor Ideas That Go Beyond Strings of Lights
Lights alone rarely carry a luxury display. The properties that stop traffic layer in three-dimensional decor: oversized ornaments, custom wreaths, garland on railings, and lit topiary.
The rule is scale. Decor should match the architecture, not the shelf it came from. A 24-inch wreath disappears on a two-story entry; a 48-inch wreath anchors it. Garland should run the full length of a railing rather than stopping short.
For commercial properties, this layering is what turns a storefront into a landmark. Houston Light builds holiday decorating services around exactly this mix of lighting and decor, including custom wreaths and garland sized to the building.
Modern LED Holiday Lighting Trends Worth Using in 2026
LED remains the standard: it runs cooler, draws far less power than incandescent, and lasts for years. The 2026 trends worth adopting are mostly about control, not wattage. The hardware to run a real animated show has dropped in price enough that a homeowner with a two-story façade can now build what used to require a commercial integrator.
Pixel Mapping and Sequencing, Explained Without the Jargon
Pixel mapping assigns each individual LED a specific color and timing instruction, letting a strand display moving patterns rather than a single static color. Each pixel is individually addressable, so the controller can tell pixel 47 to be red while pixel 48 is blue at the same instant.
Sequencing is the choreography layer on top: the timeline that tells each pixel when to change. A sequence is essentially a spreadsheet of time stamps and color values, played back by software that pushes data to the controller.
The practical stack looks like this:
- Pixels. Individually addressable LED strands, most commonly WS2811 or WS2812B chips. WS2811 is the workhorse for outdoor displays because it runs on 12 volts, which tolerates longer runs and voltage drop better than the 5-volt WS2812B.
- Controller. A device that receives sequence data and drives the pixels. Popular hobbyist-grade controllers include Falcon and Kulp boards; commercial installs often use proprietary controllers tied to the manufacturer’s ecosystem.
- Sequencing software. xLights is the most widely used free option and supports most controllers. It handles the timeline, preview, and export to the controller’s file format.
- Data distribution. Either a wired Ethernet run to each controller or a wireless bridge. Wired is more reliable; wireless is easier on a finished home.
- Audio. A small FM transmitter broadcasts the music to car radios so neighbors can tune in without you installing outdoor speakers.
What a Beginner Show Actually Requires
A first animated show does not need to cover the whole house. A common starting point is a single roofline run of pixels plus one or two lit elements, driven by one controller and sequenced in xLights. That’s enough to learn the workflow without the full-property data and power infrastructure a large show demands.
The failure modes are predictable. Data runs over roughly 15 feet between controller and first pixel often need a null pixel or signal amplifier to avoid flicker. Power injection is almost always required on runs longer than about 50 pixels at full brightness. And sequencing takes far longer than most beginners expect; a three-minute song can take many hours to choreograph well.
Where Static Still Wins
Animated shows are not automatically more luxurious. A perfectly sequenced show on a modest home can read as a hobby project, while a warm static outline on a large home reads as expensive. The luxury signal comes from restraint, symmetry, and consistent color temperature, not motion.
For most homeowners, the highest-value use of 2026 LED technology is a warm white static display on a dusk-to-dawn astronomical timer, with a single animated focal element (a lit wreath, a wrapped tree, or a doorway arch). That delivers the visual impact of a show without the power, data, and sequencing overhead of a full-property install.
If you want to try sequencing without committing to a full show, start with a single pixel matrix or a pixel wreath. The workflow is identical to a full-house show, but the hardware cost and troubleshooting surface are a fraction of the size.
::: luxury backyard retreat.
Permanent vs. Temporary: The 2026 Hardware Question
A growing share of luxury installs now use permanent LED track systems mounted under the eaves, which stay up year-round and change color and pattern via app or controller. The appeal is obvious: no annual install, no ladder work, and the ability to switch from holiday red-and-green to game-day colors to warm white for everyday curb appeal.
The trade-offs are equally real. Permanent systems are a larger up-front investment, they’re visible as a track during daylight if not carefully color-matched to the trim, and they lock you into one manufacturer’s ecosystem for bulbs and controllers. For a homeowner who plans to stay for years and wants the display to evolve, permanent can pencil out. For a homeowner who wants a specific look for six weeks a year, temporary commercial-grade strands remain more flexible.
Power, Hardware, and Weatherproofing for a Flawless Installation
Power planning is the least glamorous part of how to design luxury Christmas light displays and the one that sinks the most amateur installs. The math is simple, but skipping it causes tripped breakers, dim far ends of runs, and flickering pixels in week three.
Do the Wattage Math Before You Buy Anything
Every strand has a rated wattage printed on the tag or packaging. Add the wattage of every strand on a circuit, then divide by 120 volts to get the amperage that circuit will draw. A standard 15-amp household circuit should carry no more than 80 percent of its rating on a continuous load, putting the practical ceiling around 12 amps, or roughly 1,440 watts, per circuit (osha.gov).
That ceiling arrives faster than most people expect. A single 100-foot run of traditional incandescent C9 bulbs can pull well over 1,000 watts on its own; the same run in LED C9 typically draws under 100 watts, which is why commercial installers standardize on LED even for a vintage look. If your plan exceeds one circuit, split the display across multiple circuits and label each at the panel so mid-season troubleshooting isn’t a guessing game.
Commercial-Grade vs. Consumer Retail: What You’re Actually Paying For
This is the gap most guides skip. Big-box retail strands are built to a price point for one or two seasons of casual use. Commercial-grade components are built for repeated install, removal, and re-install without failure. The differences that matter:
- Wire gauge. Consumer strands often use 22 AWG or thinner. Commercial C9 spools typically use 18 AWG or heavier, which carries more current with less voltage drop over long runs.
- Bulb construction. Commercial C9 bulbs use sealed, replaceable sockets and thicker glass or polycarbonate envelopes rated for outdoor exposure. Retail bulbs often have molded, non-replaceable sockets, so one dead bulb can retire the whole strand.
- Connectors. Commercial systems use sealed, keyed connectors (often proprietary to the manufacturer) that resist moisture intrusion. Retail plugs are usually unsealed and corrode at the first hard freeze.
- Rated lifespan. Commercial LED bulbs are commonly rated for tens of thousands of hours and carry multi-season warranties. Retail strands are typically rated for a fraction of that with no meaningful warranty.
The trade-off is real: commercial-grade components cost more up front and are usually sold through lighting distributors or direct from manufacturers rather than at retail. For a display you install once and leave up for six weeks, retail can work. For a display you reinstall every year, or one on a commercial property, commercial-grade hardware is cheaper over a five-year horizon because you stop replacing failed strands.
Voltage Drop, Wire Gauge, and Run Length
Voltage drop is the silent killer of long runs. The farther current travels from the power source, the more voltage it loses, and the visible symptom is a strand that dims or shifts color toward the far end. The fix is heavier wire gauge on long runs, or splitting a long run into shorter segments each fed from its own power source.
A common pattern among installers is to keep any single feed under roughly 100 feet on 18 AWG, and step up to 16 AWG or 14 AWG for longer home runs. If you’re running power from a single outlet to multiple zones, plan the feed routes on paper first; retrofitting a heavier gauge after the clips are up means pulling everything down.
Controllers, Power Injection, and Pixel Displays
If you’re building an animated or pixel-mapped display, the power layer gets more demanding. Pixels draw power in aggregate, and a single controller can only push so much current before the far end of the strand browns out. The standard solution is power injection: running additional power feeds into the strand at intervals so no single segment carries the full load.
Most pixel controllers publish a maximum amperage per output port. Stay well under it. A controller rated for 5 amps per port should not run at 5 amps continuously; heat and voltage sag shorten its life and cause visible flicker. Size the controller for the display you plan to build in two years, not just this season, because swapping controllers mid-display means re-running data and power.
Weatherproofing Every Connection
Water is what kills outdoor lighting, and it gets in at the connections, not the bulbs. Treat every outdoor connection as a potential failure point:
- Use GFCI-protected outlets for every outdoor circuit, as recommended by Electrical Safety Foundation guidance
- Apply dielectric grease to every male/female connection before mating
- Wrap exposed connections in self-sealing silicone tape, not standard electrical tape, which degrades in UV and cold
- Elevate connections off the ground and out of standing water paths
- Use covered, gasketed housings for any inline controller or power supply
Mounting Hardware That Won’t Damage the House
Staples through the jacket of a strand are the fastest way to a mid-season failure and a hole in your trim. Use clips rated for the surface: all-in-one clips for shingles and gutters, adhesive-backed clips for smooth fascia (cold-weather adhesive is unreliable below freezing), and magnetic clips for metal gutters and trim. Match the clip to the surface, not the other way around.
Animated shows fail most often at the power layer, not the software layer. Undersized controllers, thin wire gauge, and long data runs cause flicker and dropped pixels, and diagnosing it after installation is far more expensive than specifying it correctly up front.
When to Hire Professional Holiday Lighting Services
Hiring out makes sense when the roofline is steep or high, when the property is large, or when you want the display maintained through the season rather than repaired by you in the cold.
Commercial and HOA properties almost always justify a professional team. Houston Light handles commercial holiday lighting and HOA common-area displays with insured labor and a lifetime warranty on all lighting installed, removing the two biggest risks: someone getting hurt on your roof, and a strand dying in week two with no one to call.
Ask any provider three questions before signing: who is insured, what the warranty actually covers, and how maintenance calls are handled mid-season.
Conclusion: Turning Your Design Plan Into a Display
The gap between a good display and a great one is planning, not spending. Measure the property, pick one focal point, hold a single color temperature, and size the power and hardware before the first clip goes up.
If you’d rather hand the whole thing to a team that does this every season, Houston Light brings the latest LED technology, custom decor, and a lifetime warranty on every installation. Get a free estimate and start with a design plan built for your property.
Frequently Asked Questions
How do you achieve a professional, high-end look with holiday lights?
Start with a plan instead of buying strands first. Measure the roofline, eaves, and trees, then choose one focal point and build outward with symmetry. Use commercial-grade LED string lights in a consistent color temperature, hide all extension cords and mounting clips, and put everything on a dusk-to-dawn timer. A single warm white tone across the whole facade reads as more expensive than a mix of colors, and it photographs better for curb appeal.
What are the current trends in modern LED holiday lighting?
Warm white and single-color schemes have replaced multicolor strings on higher-end homes. RGB pixel mapping and sequencing let homeowners run a static display most nights and switch to an animated show for parties. Other trends include architectural integration that follows the facade rather than outlining it, projection mapping on blank walls, and commercial-grade hardware with weatherproof connectors. Dusk-to-dawn timers and low-voltage controllers are now standard on professionally installed systems.
How can you incorporate custom wreaths and garland into a light display?
Treat wreaths and garland as focal elements, not filler. Place a large custom wreath at the center of the facade or above a garage, and run garland along porch railings, columns, and door frames to connect the roofline to the ground. Light the garland from within using warm white LED string lights so it matches the rest of the display. For commercial properties, oversized ornaments and lit garland on entries draw foot traffic and photograph well for social media.
What happens if a light strand fails after installation?
On a professionally installed system, a failed strand is usually a warranty call, not a repair project. Commercial-grade LED string lights and weatherproof connectors cut failure rates compared with retail strands, and a lifetime warranty on installation means the crew returns to fix or replace the section. If you install the display yourself, keep spare strands of the same color temperature on hand and check every connection after the first hard freeze or heavy rain.