Table of Contents
- Plan Your Outdoor Holiday Lighting Setup
- Essential Tools for Installing Holiday Lights
- Choosing the Right Light Clips and Hooks
- How to Hang Roof Lights Safely on Rooflines and Gutters
- How to Prevent Electrical Overload with Holiday Lights
- Managing Extension Cords and Power Sources
- Post-Season Removal and Storage for Next Year
- Conclusion: Enjoy a Safe and Bright Holiday Season
- Frequently Asked Questions
Last Updated: September 7, 2026
Stringing lights along your roofline is a tradition that transforms a house into a neighborhood landmark, but it carries real risks that most DIY guides gloss over. Falls from ladders, electrical shorts, and overloaded circuits send thousands of people to the emergency room each holiday season, yet nearly all of these incidents are preventable (cpsc.gov). This guide from Houston Light, a professional installation company with over 15 years of experience, walks you through the safest methods for installing outdoor holiday lighting, from planning your layout to managing power loads.
Plan Your Outdoor Holiday Lighting Setup
Safe outdoor holiday lighting installation starts long before you climb the first rung of a ladder. A thoughtful plan prevents accidents, reduces electrical strain, and saves you from the frustration of re-hanging strands halfway through the job.
Begin by measuring the exact linear footage of every surface you intend to decorate, including gutters, rooflines, railings, and trees. Add 10 percent to your total to account for slack and connection points. Next, sketch a simple diagram of your home, noting where each outlet is located and which direction you will run each strand.
Most importantly, decide where you will plug everything in. Outdoor-rated outlets with GFCI protection are the only safe power source for this project. If your home lacks these, you will need to factor in the cost of having an electrician install them before you proceed.
Essential Tools for Installing Holiday Lights
Gathering the correct equipment ahead of time keeps you safe and prevents mid-project trips to the hardware store.
Your installation kit should include a sturdy fiberglass extension ladder rated for your weight, a voltage tester, and a GFCI outlet tester. You will also need outdoor-rated extension cords, light clips specifically designed for gutters or shingles, and insulated staples only if you are running lights along a wooden fascia board. For two-story homes, consider a safety harness and a second person to stabilize the ladder base.
Before you start, inspect every strand for frayed wires, cracked sockets, or loose connections. Damaged lights are a fire hazard and should be discarded, not repaired with tape. The U.S. Consumer Product Safety Commission guidance on holiday light safety recommends checking all light strands for damage before use, as worn wiring is a leading cause of holiday fires.
Choosing the Right Light Clips and Hooks
The clips you choose determine both the security of your display and the condition of your home’s exterior. Using the wrong fastener, like nails or staples, can damage shingles, gutters, and siding while also voiding your roof’s warranty.
For gutters, use gutter hooks that clip onto the lip without piercing the metal. For shingle roofs, choose clips that slide under the shingle tab and grip the edge, which holds the light securely without lifting or cracking the shingle. Fascia-mounted clips are available for homes without gutters, and these screw gently into the wood or use adhesive backing for vinyl surfaces.
Space clips approximately every 12 inches to keep the strand taut but not stretched. This prevents wind from catching loose sections and damaging the lights.
How to Hang Roof Lights Safely on Rooflines and Gutters
Hanging lights at height is the most dangerous part of any installation. Position your extension ladder on firm, level ground at a 75-degree angle, meaning the base sits one foot away from the wall for every four feet of height. Always maintain three points of contact and never reach more than an arm’s length from the ladder.
Work in sections, starting at the outlet and moving away from it. This allows you to plug in each strand as you go and test it immediately, rather than discovering a problem after you have hung 100 feet of lights. When connecting strands, keep the connection points accessible and off the ground.
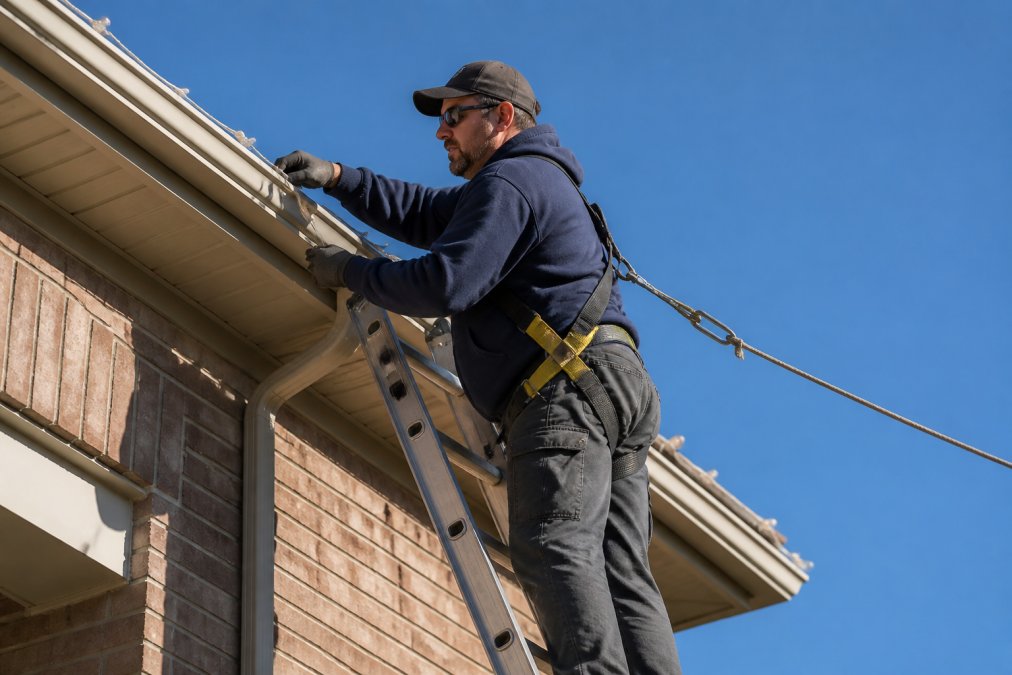
For two-story homes, a safety harness is not optional. Anchor it to a secure point on the roof, and have a partner on the ground holding the ladder base. If this sounds like more risk than you are comfortable with, professional installation services use specialized equipment and trained crews to handle elevated work safely. Houston Light’s Commercial Holiday Lighting and HOA Holiday Lighting crews handle these exact scenarios regularly, bringing their own safety systems and experience to rooflines of any height.
How to Prevent Electrical Overload with Holiday Lights
Electrical overload happens when you connect more lights to a circuit than it can handle, resulting in tripped breakers at best and a fire hazard at worst. Most DIY guides stop at “don’t overload the circuit,” but a safe installation requires understanding the math behind that warning.
Calculate Your True Circuit Load
Every circuit in your home has a wattage capacity, typically 1,440 watts for a 15-amp circuit and 1,920 watts for a 20-amp circuit. The National Electrical Code (NEC) requires you to use no more than 80 percent of a circuit’s capacity for continuous loads, which holiday lighting qualifies as, since it runs for more than three hours at a time (nfpa.org). That means your safe working limit is 1,152 watts on a 15-amp circuit and 1,536 watts on a 20-amp circuit.
Here is the step most people miss: you cannot simply add up the wattage of your light strands. You must also account for every other device sharing that circuit, including indoor outlets on the same breaker, garage door openers, and exterior receptacles. Find the breaker panel and map which outlets are on which circuit before you begin. Flip the breaker off, then use a plug-in circuit tester to confirm which outlets lose power.
The Voltage Drop Problem Nobody Mentions
Voltage drop is the technical reason your lights dim or flicker at the far end of a long run. It occurs when the resistance in an extension cord or light strand wire reduces the voltage reaching the bulbs. For incandescent strands, this manifests as a dim glow at the end. For LED strands, the effect is more dangerous: the driver circuitry compensates for low voltage by drawing more current, which can overheat the strand and create a fire risk.
To prevent voltage drop, follow these rules of thumb:
- Keep extension cord runs under 100 feet. For runs between 50 and 100 feet, use a 14-gauge cord. For runs under 50 feet, 16-gauge is acceptable.
- Do not daisy-chain more than three extension cords. Every connection point adds resistance and creates a potential failure point.
- Use a wattage meter to verify your load. A simple plug-in wattage meter, available at any hardware store, tells you the exact draw of your display. Plug the meter into the outlet, then plug your first extension cord into it. The reading tells you precisely how many watts you are using, eliminating guesswork.
The Manufacturer’s Limit Is a Floor, Not a Ceiling
Most light strand packaging states a maximum number of strands you can connect end to end, typically five for incandescent and fifteen for LED. These limits assume ideal conditions: new strands, room-temperature wire, and no extension cords. In real-world outdoor installations, cold weather makes wire insulation brittle and increases resistance. A safer practice is to use no more than three incandescent strands or ten LED strands end to end. managing fire safety.
If your breaker trips, it is a warning sign that you are overloading the circuit. Do not simply reset it. Redistribute the load by moving some strands to a different circuit, or remove strands entirely. Repeated tripping indicates a serious problem that requires attention.
Test Your GFCI Before You Hang a Single Light
Your GFCI outlet is the last line of defense against electrical shock. Press the “Test” button on the outlet, the power should cut off immediately. Press “Reset” to restore power. If the outlet does not trip when you press Test, it is defective and must be replaced before you proceed.
Managing Extension Cords and Power Sources
Extension cords are the backbone of any outdoor display, but they are also where many installations fail. Using indoor cords outdoors, or cords with insufficient gauge, creates a serious electrical hazard.
Choose the Right Cord for the Job
Outdoor-rated extension cords are marked with a “W” on the jacket, indicating they are weather-resistant. Never use indoor cords outdoors, even temporarily, the insulation is not designed to withstand moisture, UV exposure, or temperature extremes. The gauge (thickness) of the cord determines how much current it can safely carry over a given distance. For most residential displays, a 14-gauge cord is the safest choice for runs up to 100 feet. For shorter runs under 25 feet, a 16-gauge cord is acceptable. Avoid 18-gauge cords entirely for outdoor lighting; they are too thin for the load and pose a fire risk.
The Smart Home Advantage: Automation and Safety
The safest and most convenient displays today integrate smart home technology. A smart outdoor plug, such as those compatible with Amazon Alexa, Google Home, or Apple HomeKit, adds a layer of safety and control that traditional timers cannot match.
Here is why smart plugs are a safety upgrade, not just a convenience:
- Automated shutoff: You can program lights to turn off at a set time, eliminating the risk of leaving them running all night and overheating. This is especially critical for incandescent strands, which generate significant heat.
- Remote monitoring: Many smart plugs provide real-time wattage readings through their companion app. You can check your total draw from your phone without going outside, giving you a live view of your circuit load.
- Voice control: Integrating with a smart speaker lets you turn the display on or off without fumbling for a switch in the dark. This reduces the temptation to plug or unplug cords while standing on a wet lawn.
- Scheduling with sunrise/sunset: Smart plugs can be programmed to turn on at sunset and off at a specific hour, ensuring your display is never running when you are asleep or away from home.
When choosing a smart outdoor plug, look for one rated for outdoor use with a weatherproof cover. Most models are rated for 15 amps, which is sufficient for a typical residential display. Plug the smart plug directly into your GFCI outlet, then connect your extension cords to the smart plug. This places the smart control between the GFCI protection and your lights, adding an extra layer of automated safety.
Weatherproofing Every Connection Point
The connection between your extension cord and your light strand is the most vulnerable point in your entire setup. Moisture can seep in and cause a short, tripping your GFCI or starting a fire. Elevate every connection off the ground and seal it with a weatherproof cord cover, a rubber boot that snaps around the plug and creates a watertight seal. Electrical tape degrades in sunlight and leaves a sticky residue, so invest in proper cord covers.
The Ground Fault Protection Chain
Your power source should follow a specific chain: the GFCI outlet, then a smart outdoor plug, then a heavy-duty extension cord, then your light strands. The GFCI protects against ground faults, the most common cause of electrical shock outdoors. The smart plug adds automated shutoff and monitoring. Never bypass any link in this chain by plugging a light strand directly into a non-GFCI outlet or by using a damaged cord.
Testing Your Setup Before You Hang
Before you climb a ladder, lay out your entire display on the ground and connect everything: the smart plug, the extension cords, and all light strands. Turn it on and check that all strands light up at full brightness, the smart plug app shows a wattage reading within your circuit’s safe limit, and the GFCI does not trip. Troubleshoot any failures on the ground where it is safe.
Post-Season Removal and Storage for Next Year
Taking lights down correctly is just as important as hanging them safely. Rushing this step damages your investment and creates hazards for the next season.
Remove lights on a dry day when the clips and wires are not brittle from cold weather. Work in reverse order of installation, starting at the power source and unplugging before you remove any strand. Never yank lights from clips.
Once down, inspect each strand for damage and discard any that show wear. Coil each strand loosely around your hand or a spool to prevent kinks, and store them in a labeled, airtight container. Moisture is the enemy of stored lights, so add a desiccant packet to each container to absorb humidity. Proper storage extends the life of your lights and ensures they work when you need them next year.
Conclusion: Enjoy a Safe and Bright Holiday Season
A safe installation is the foundation of a joyful holiday display, and the effort you put into planning, using the right tools, and respecting electrical limits pays off in peace of mind. If the thought of ladder work or electrical calculations feels overwhelming, professional help is a reliable alternative. Houston Light brings over 15 years of experience to residential and commercial installations, using the latest LED technology and weather-resistant materials backed by a lifetime warranty on all lighting installed. Our insured crews handle everything from design to post-season removal, and our Holiday Decorating services extend beyond lighting to complete seasonal displays. Get a free estimate and let us light up your home safely this year.
Frequently Asked Questions
Do you need an electrician to install outdoor lighting?
For plug-in holiday light displays, you typically do not need an electrician. The main electrical task is connecting lights to a GFCI outlet. However, if your outdoor outlets are outdated, not grounded, or you plan to install permanent lighting that connects to your home’s electrical system, hiring a licensed electrician is the safe choice. They can ensure your system handles the electrical load and meets local codes.
How do I prevent electrical fires when using outdoor holiday lighting?
Preventing electrical fires starts with inspecting every light strand for frayed wires, cracked sockets, or loose connections before installation. Always use lights and extension cords that are UL-listed for outdoor use. Avoid daisy-chaining more than three strands of traditional lights, and never run cords under rugs or through windows where they can be damaged. Plug everything into a GFCI outlet to protect against ground faults.
What tools are recommended for safely hanging lights on a roofline?
For a safe installation, you need a sturdy extension ladder rated for your height, light clips designed for gutters or shingle tabs, and insulated staples if you must secure cords. A voltage tester helps confirm outlets are off before any work. Using a clip gun or pole system can help you reach high areas without overreaching. Avoid using nails or screws, which can damage your roof and create a fire hazard.
What is the rule of thumb for outdoor lighting?
A common rule of thumb is the 100-watt rule: do not connect more than 100 watts of lighting on a single extension cord or outlet circuit. Since LED strands use far less power, you can often connect more of them safely. Always check the wattage on the box and calculate your total electrical load to prevent tripping breakers. When in doubt, use fewer strands per outlet or consult a professional.